Product description
-
Easy to use and featuring an elegant design the ELECTRONIC DIGITAL CLOCK THERMOSTAT with DAILY PROGRAMMING is used to set the temperature of the room in which it is installed, consequently it can satisfy user needs in terms of environmental comfort. Available in both the basic version and with backlit display, the device was designed in Italy, where it also made.
For proper use, it is recommended to carefully read this manual and to keep it for future reference.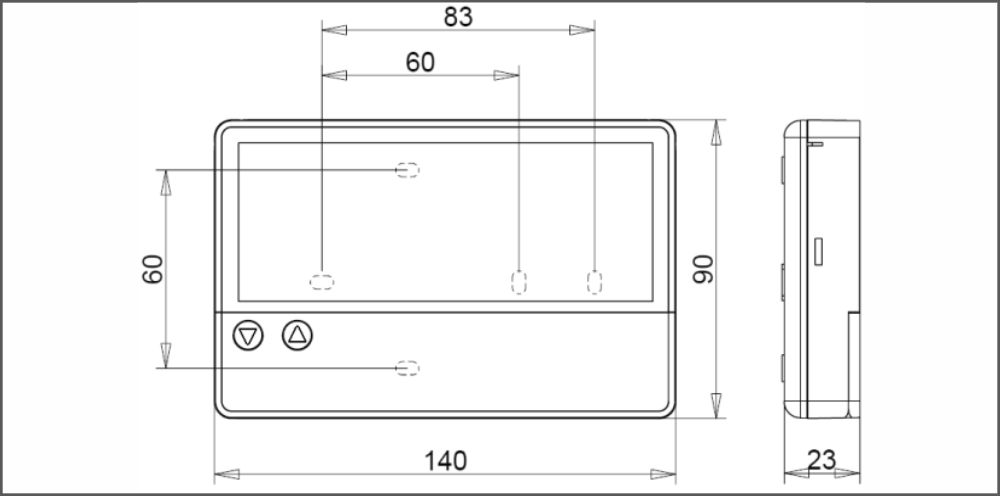
Dimensions AVAILABLE VERSIONS
The thermostat is available in both the basic version and in the version with backlit display.
Compared to the basic version, the one with backlit display is easier to see in environments with poor lighting conditions.
This function turns on automatically by pushing any button on the thermostat, and when the batteries are replaced.
To make the batteries last longer, the display backlighting function turns off automatically after about 20 seconds from the last operation carried out, and when symbol flashes on the display.
CONFORMITÁ ALLE DIRETTIVE
- B.T. 2006/95/CE
- EMC 2004/108/CE
- ROHS 2002/95/CE
CONFORMITÁ ALLE NORME
- EN 60730-1
- EN 60730-2-9
The thermostat must be installed by a qualified technician, in strict compliance with the safety standards and law provisions in force.
The manufacturer is not liable for improper product use.Cut off power to the electrical system before carrying out any connections.
Do not tamper with any part of the product for any reason.
In case of persistent anomalies, please contact your trusted technician or the store.The Manufacturer reserves itself the right to make changes to the thermostat or to this instructions manual with no advance notice required, for the purpose of improving the product and its use.
Technical specifications
-
Power supply 2 Alkaline Batteries 1.5V LR6 (Type AA)
Battery life Expected service life of more than 1 year
Maximum capacity of the contacts 8A(1)250VAC / 30VDC
Type of action 1BU
Display Display a cristalli liquidi, con o senza retroilluminazione
Temperature display range 0°C÷50°C
Temperature regulation range NORMALE (T1) = 5°C÷35°C
REDUCED (T2) temperature selectable values 6°/14°/16°/18°C (INVERNO)
26°/28°/30°/38°C (ESTATE)
Temperature resolution 0,1°C
Temperature probe NTC 1%
Temperature differential on regulation 0,2K
Operating time 1 minute
Output changeover relay (Type 1A+1B)
Recommended maximum load 5A(1)250VAC / 30VDC
Degree of protection IP20
Insulation class Type II (double insulation)
Pollution degree II
Software Class A
Storage temperature 0÷60°C
Maximum operating temperature 50°C
Installation wall (holes provided for standard 60-mm round boxes and 3 modules rectangular ones)
Selectable “WINTER” or “SUMMER” mode Sì, è selezionabile
“AUTO” function between two temperature levels, NORMAL (T1) and REDUCED(T2) Sì, esiste
“AUTO” function - programming Daily
“AUTO” function - Minimum programming interval 1 hour
“OVERRIDE” function of NORMAL (T1) or REDUCED (T2) temperature Sì, esiste
“FROST-PROTECTION” function - override at 6°C with differential 2K Sì, esiste
Simultaneous display of
Set temperature
Detected temperature
Clock
Operating mode
Time programme
Battery status
Installation environment domestic
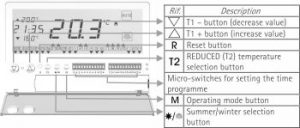
Thermostat control keys
-
CONTROLS LEGEND
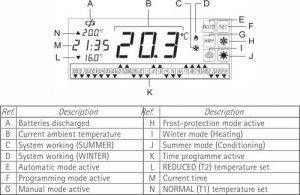
DISPLAYED SYMBOLS LEGEND
Installation
-
Positioning
The position in which the thermostat is installed can have a significant impact on its performances.
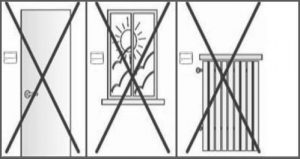
The device must be installed on the internal wall of a room where you usually spend your time, away from draughts (doors, windows, fans, etc.), sources of heat (radiators, sun’s rays, kitchens, household appliances such as televisions, refrigerators, computers, etc.), and vibrations, at about 1.5m from floor level, ensuring normal air flow around the thermostat.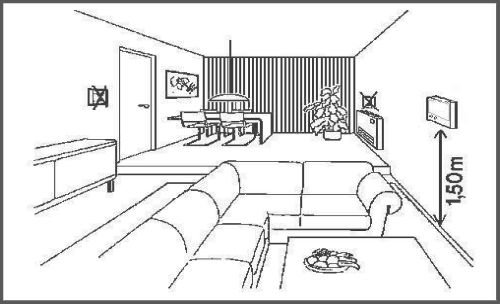
Installation
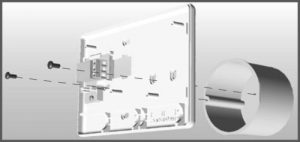
With reference to the figures on the side, open the thermostat by pressing down lightly on the side slot and remove the front panel from the base
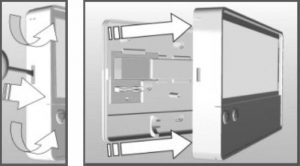
Remove the cover that protects the electrical terminals by sliding it to the side.
Secure the base to the wall using the holes provided for various installation needs, being careful to properly pass the cables through the special slot
N.B.: When securing the device to a brick wall, it is recommended to use plugs with max. outer diameter of 5 mm, making sure you do not tighten the screws excessively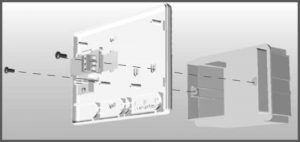
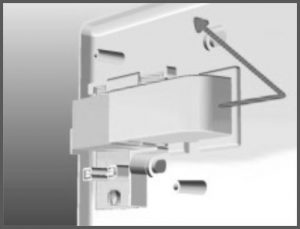
Connect the wires to the terminal board as shown in the electrical diagram, and reposition the terminal cover by sliding to the side after inserting it in the special housing
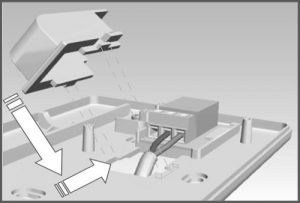
After replacing the front plane open the front panel, unfasten the battery holder cover and insert two 1.5V type LR6 batteries (AA alkaline) in the special compartment, according to the indicated polarity.
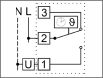
Electrical connections
This thermostat can be used to drive either a boiler (or an air conditioning unit) by a potential-free contact or to directly pilot a USER LOAD (e.g. Circulation pump).
- POTENTIAL-FREE CONSENT: connect the device to be enabled directly to terminals No.1 and No.2
- LOAD USER SUPPLIED (230VAC) COMMAND: connect the cables to terminals No.1 and No.2 as in the following electrical diagram :
Description of controls and operation
-
TURNING ON THE DEVICE FOR THE FIRST TIME
After inserting the batteries and consequently powering on the thermostat, the display shows for a few seconds all the available segments and symbols (self-diagnostics), after which the thermostat presets itself for the clock programming. The “SET” icon flashes during this phase.
1. Set the hour using the buttons


2. Press “M” to confirm.
3. Set the minutes using the buttons
4. Press “M” to confirm.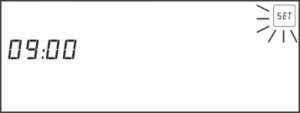
Once the clock setting operation has ended (or in any event after 10 minutes have elapsed from its activation), the thermostat presets itself for system activation, depending on the time programme, with the following settings:
- Operation = WINTER
- mode = AUTO
- NORMAL (T1) temperature =20°C
- REDUCED (T2) temperature =16°C
SETTING THE TIME PROGRAMME
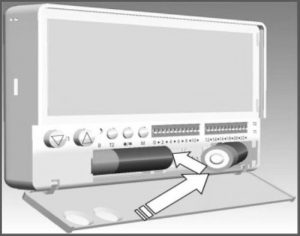
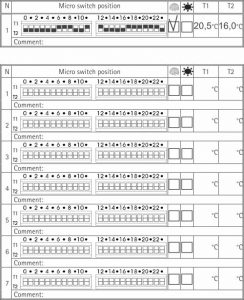
The device is equipped with a row of micro switches with 24 levers that correspond to the hours in a day.
The time programme is easy to set; simply push the levers upward (position T1) for the hours in which you want to have a NORMAL temperature, and push them downward (position T2) for the hours in which you want a REDUCED temperature. Example: Micro switch 7 in the up position means that the NORMAL (T1) temperature is set from 7:00 am to 7:59 am.
All changes made to the position of the micro switches will be shown at the bottom of the display and become operational right after it is set.
The set time programme will be the same for all days of the week.SETTING THE SUMMER / WINTER OPERATION
The thermostat can be set for “summer” or “winter” operation, depending on whether an air conditioner or a boiler is connected to it. To switch from SUMMER and WINTER mode, press button
 for at least 5 seconds. The display will show on the right the special icon according to the active selection (
 ) or the WINTER mode and
  for the SUMMER mode).
SETTING THE OPERATING MODE
Button “ “ can be used to select one of the four operating modes offered by the thermostat. Each time you press the button, the operating mode will change as shown in the image below:
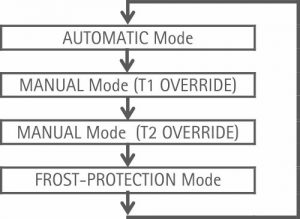
Note: The AUTOMATIC and manual operating modes in OVERRIDE T1 or T2 can be combined with both SUMMER and WINTER modes, while the FROST-PROTECTION mode automatically sets the thermostat to WINTER operation.
Automatic mode
In AUTOMATIC mode, the thermostat sets the ambient temperature at the T1 or T2 values, according to the programming of the micro switches.
To confirm the active automatic mode, the display shows the AUTO icon, the values set for T1 and T2, and the time programme.
(Example of display in winter operation)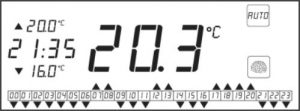
Manual mode T1 OVERRIDE
In this MANUAL mode, the thermostat sets the ambient temperature at the NORMAL (T1) temperature, regardless of how the micro switches are programmed.
To confirm that the NORMAL OVERRIDE is active, the display shows icon MAN and the value set for T1.
(Example of display in winter operation)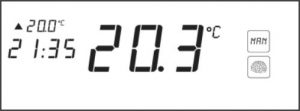
Manual mode T2 OVERRIDE
In this MANUAL mode, the thermostat sets the ambient temperature at the REDUCED (T2) value, regardless of how the micro switches are programmed.
To confirm that the REDUCED OVERRIDE is active, the display shows icon MAN and the value set for T2.
(Example of display in winter operation)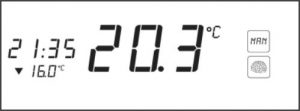
FROST-PROTECTION Mode
In this mode, the thermostat sets the ambient temperature at a value of 6°C, and cuts out both the programming of the micro switches and the possibility to change the SUMMER/WINTER operation setting.
To confirm that the FROST-PROTECTION is active, the display shows icon FROST-PROTECTION, and the relevant set temperature value (6°C)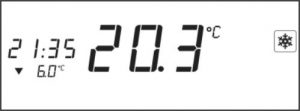
SETTING THE NORMAL TEMPERATURE (T1)
You can always set NORMAL (T1) temperature, even with the front panel closed, by pressing buttons
You can change the temperature between 5°C and 35°C in 0.1°C increments in both winter and summer operation.
During the setting, the icon flashes until the new value is stored.
SETTING THE REDUCED TEMPERATURE (T2)
The REDUCED (T2) temperature is set by pressing button “ “ in sequence.
Its value can be selected from 6°C, 14°C, 16°C or 18°C in case of winter operation, or 38°C, 30°C, 28°C or 26°C in case of summer operation.
During the setting, the icon flashes until the new value is stored.SETTING THE CLOCK
To change the displayed time, press in sequence button
and then button , keeping both of them pressed at the same time for 5 seconds, then:
1. Set the hour using buttons
2. Press “M ” to confirm.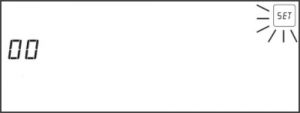
3. Set the minutes using buttons
4. Press “M ” to confirm.

During this phase, the “SET” icon flashes on the display.
Note: If the CLOCK PROGRAMMING procedure is not completed within 10 minutes from the time it is started, the clock thermostat resumes operation, maintaining the previous settings.
REPLACING THE BATTERIES
When the symbol
(batteries discharged) flashes on the display, the batteries must be replaced as soon as possible.
In this situation, the clock thermostat will keep on working properly for a short period of time, after which the system will be turned off permanently using the energy left over in the batteries. From this moment on, the display will show both the writing and the fixed symbol .
CAUTION!
- Permanent system deactivation is not guaranteed in case of anomalous discharging of the batteries.
- Rechargeable batteries cannot be used for this device.
- Use only quality alkaline batteries.
To replace the batteries, lift up the front panel and unfasten the battery holder cover, then take out the discharged batteries and put in 2 new 1.5V type LR6 batteries (AA alkaline) in the special housing, according to the indicated polarity. Once the batteries have been replaced, put the cover back on the battery holder compartment and close the front panel.
After putting in the batteries, the display shows all the available segments and symbols for a few seconds (self-diagnostics), after which the device presets itself for CLOCK PROGRAMMING. The “SET” icon flashes during this phase.1. Set the hour through button
2. Press ”M ” to confirm.1. Set the minutes through buttons
2. Press “M ” to confirm.Once the clock setting sequence is completed (or in any event after 10 minutes have elapsed from its start), the clock thermostat presets itself to turn on the system, according to the time programme and the previously entered settings.
Note: under normal conditions of use, batteries allow the thermostat to work for more than 1 year. However, it is recommended to replace the batteries when the heating
(batteries discharge) does not appear on the display, and to remove them in case of long periods of inactivity.
To protect the environment, spent batteries must be thrown away in special containers so that they can be properly disposed of.RESETTING THE DEVICE
Press button “ “ (Reset) to reset the device without affecting any previously set operating parameters, except for the clock which is zeroed out.
The positive outcome of the resetting operation is confirmed by the simultaneous display, lasting a few seconds, of all the symbols (self-diagnostics), followed by the request to set the clock (hours and minutes).
Once the clock setting sequence is completed (or in any event after 10 minutes have elapsed from its start), the clock thermostat presets itself to turn on the system, according to the previous settings.CLEANING
To clean the thermostat, it is recommended to use a soft cotton cloth, slightly dampened. Do not use Kleenexes to clean the display.
Avoid using detergents, solvents, abrasive products, alcohol, ammonia or generic products that can damage the thermostat case.QUICK SETTING GUIDE
In this summary table you can note down and keep the frequently used settings, with a short message at the end, so that they can be used immediately in the future. Example of programming note in HEATING mode :
Problem solving
-
Problem
The device does not turn on
Possible cause- Batteries exhausted
- Batteries inserted incorrectly
Solution- Replace the batteries
- Check the polarity and that the parties have been inserted properly
ProblemThe icon
flashes on the displayPossible cause- Batteries almost discharged
Solution- Replace the batteries as soon as possible
ProblemFixed icon
and wording on the displayPossible cause- Batteries completely discharged
Solution- Replace or remove the discharged batteries
ProblemThe Heating or Conditioning systems do not turn on
Possible cause- Wrong connections
- Wrong setting of the Summer/Winter operating mode
- Set temperature is below (Winter operation) or above (Summer operation) the current ambient temperature
Solution- Check the connections between user load and the device
- Make sure the setting is correct and reprogram it if necessary (see instructions)
- Set the proper temperature using or
 (vedi istruzioni)
ProblemThe Heating or Conditioning systems do not turn on at the set times
Possible cause- FROST-PROTECTION or MAN OVERRIDE (T1 or T2) functions are active
- Wrong programme setting
- Wrong setting of the current time
Solution- Turn off the function in question and set the device on AUTO mode
- Check the micro switches (see instructions)
- Make sure the clock is programmed correctly (see instructions)
ProblemThe ambient temperature displayed does not correspond to the actual temperature
Possible cause- Thermostat installed incorrectly
- Air draught coming from the tube that brings the electrical system wires to the thermostat
Solution- Follow the instructions provided in paragraph ‘POSITIONING’
- Seal the tube conduit to avoid warm or cold air draughts
ProblemThe message
 OR
OR  flashes on the displayPossible cause
- Wrong reading of the ambient temperature sensor
SolutionPress “ “ (reset) button
ProblemThe device behaves “irregularly”
Possible cause- Batteries are not the alkaline type
- Unidentified cause
Solution- Use alkaline batteries 1.5V LR6 (Type AA)
- Press “ “ (reset) button
