Product description
-
PRODUCT DESCRIPTION AND TECHNICAL SPECIFICATIONS
This product is manufactured according to the EN 60730-2-9, EN 60730-2-7 standards, in accordance with the applicable EC directives and is entirely manufactured in Italy.
Technical specifications
Power supply: Alkaline Batteries 2×1.5V LR6 (Type AAA)
Battery life > 1 year
ErP class = IV (-2%) in ON/OFF mode with TPI
ErP class = I (-1%) in traditional ON/OFF mode
Maximum contact capacity: 5A(1A) 250VAC
Programming: Daily/Weekly (second model)
Operation Mode: Manual / Automatic / Antifreeze
Minimum time slot programming: 0.5 h
Programming on two temperature levels
Temperature regulation range: 5.0÷35.0°C
Temperature display range: 0.0÷50.0°C
Temperature differential: adjustable from 0.1 to 2.0 K (standard 0.2 K)
Maximum ambient temperature: 50°C
Temperature probe: NTC 100KΩ@25°C
Degree of protection: IP20
Insulation class: Type II (double insulation)
Type of action: 1B
Pollution degree: 2
Software: class A
Resistance to heat and fire: Category D
Storage temperature: -25 ÷ 60°C
Type of system: Heating/Air Conditioning
Assembly: Wall-mountedWARNING!
The installation of the programable thermostat must be performed by a qualified technician. It is advisable to perform the installation strictly respecting the safety regulations and the legal provisions in force. Before making any connections, ensure that the main switch is turned off. The manufacturer is not responsible for improper use of the product.
Technical specifications
-
Thermostat control keys
-
Key legend
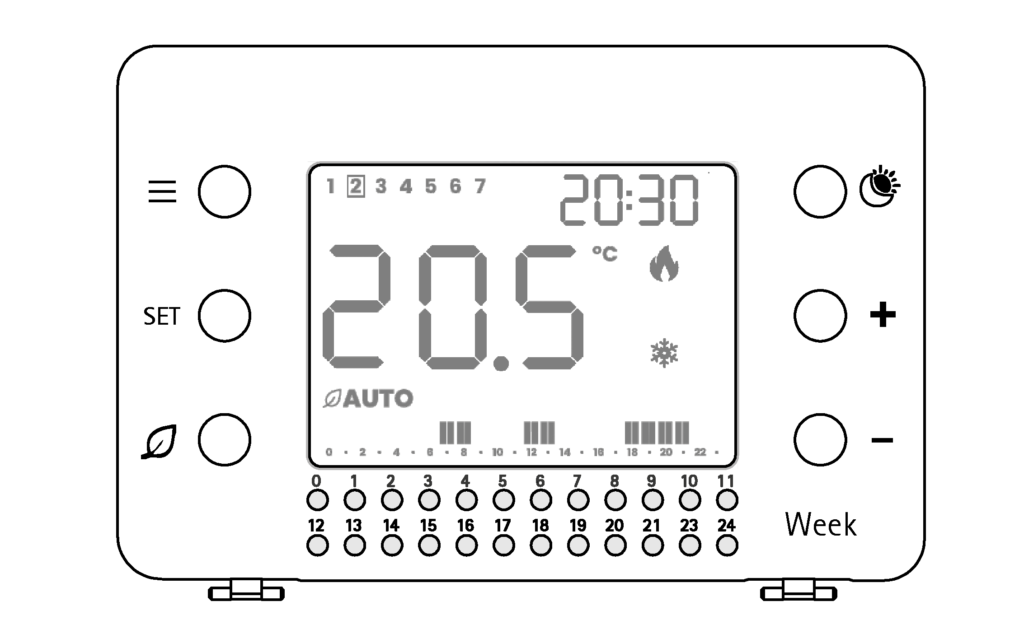
 Menù
Menù
SET SETTINGS
 AUTO/MAN/OFF OPERATION MODE
 COMFORT/REDUCED TEMPERATURE SETTING
+ VALUE INCREASE
– VALUE DECREASE
0-23 Time program keys
Day/Week DEVICE MODEL (Daily/Weekly)Display legend
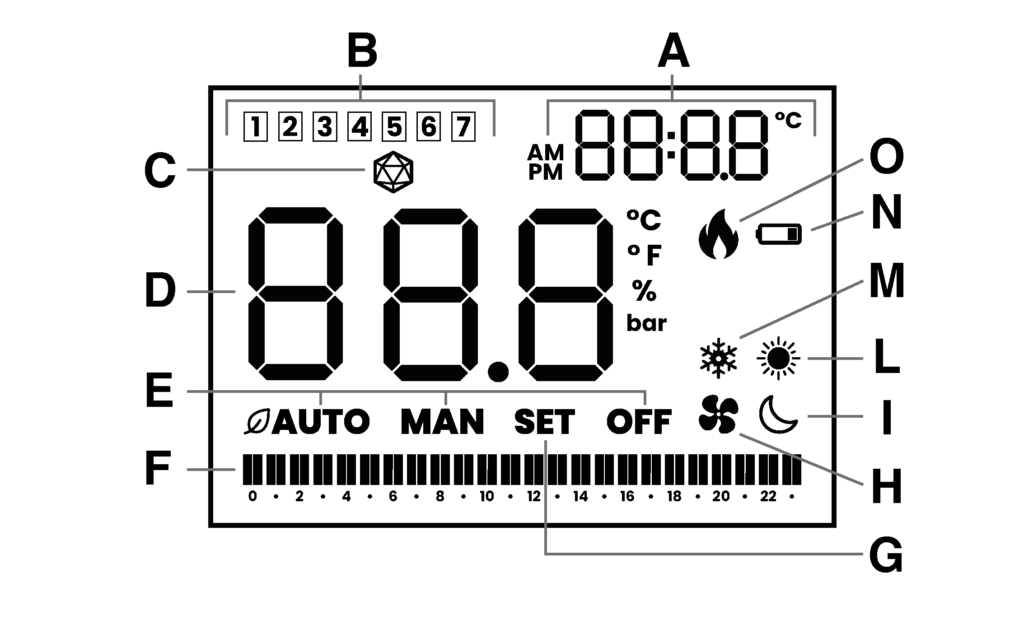
A CLOCK / TEMPERATURE SET
B DAY OF THE CURRENT WEEK (Week version only)
C DISPLAY BRIGHTNESS SETTING
D ROOM TEMPERATURE
E OPERATION MODE (Auto/man/OFF)
F TIME PROGRAM active
G PARAMETER SETTING
H SYSTEM IN OPERATION (Air conditioning)
I REDUCED TEMPERATURE ACTIVE
L SUMMER Mode (Air conditioning)
M WINTER mode (Heating)
N BATTERIES DEPLETED
O SYSTEM IN OPERATION (Heating) Installation
-
Installation
Install the device away from heat sources and drafts, about 1.5m from the floor.

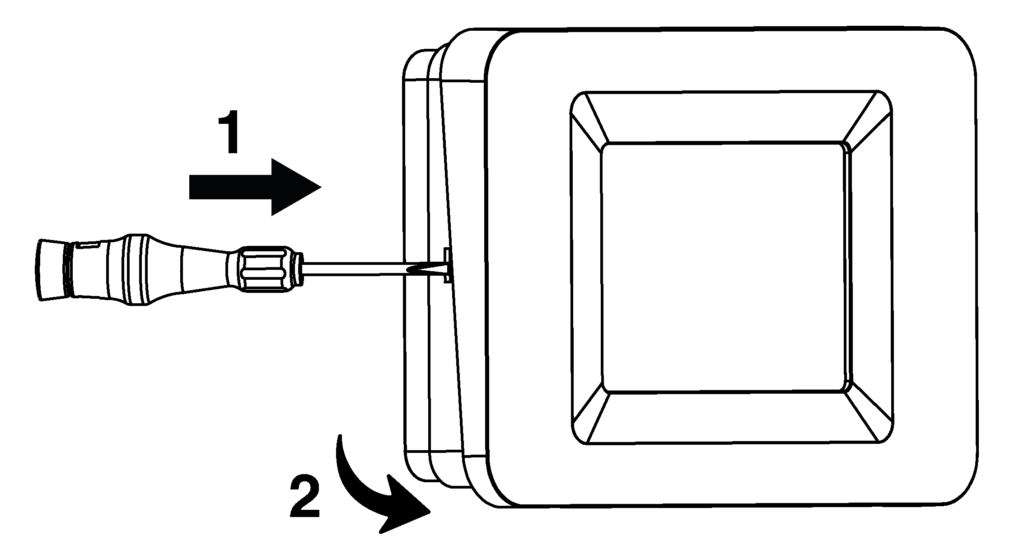
Open the device by pressing the tab on the LEFT side of the base (1), turn the front SLIGHTLY to the RIGHT (2) and LIFT IT to release it.
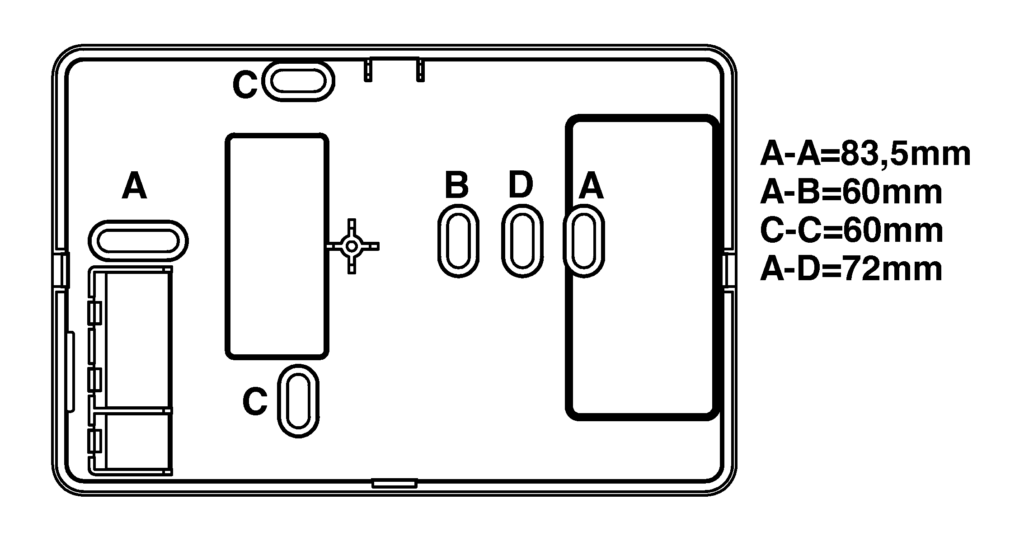
Remove the inner cover over the clamps by unscrewing the retaining screw and turning the cover to the left. Fix the base to the wall, using horizontal (A-B, A-D, A-A) or vertical (C-C) spacing.
Electrical connections
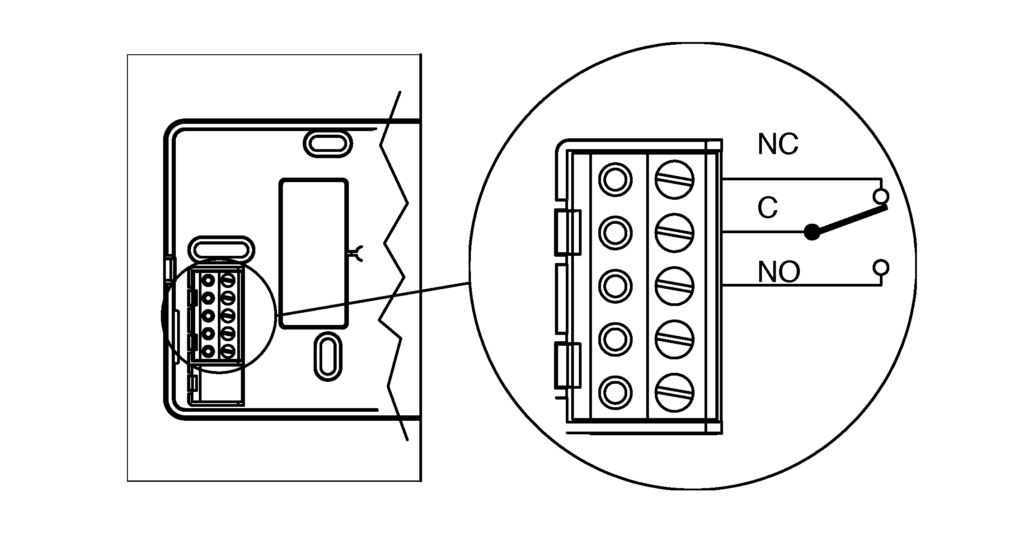
Insert the cables through the opening on the bottom and connect them to the terminal board respecting the diagram shown on the label inside the appliance, then reposition the inner cover by screwing the relative screw back on.
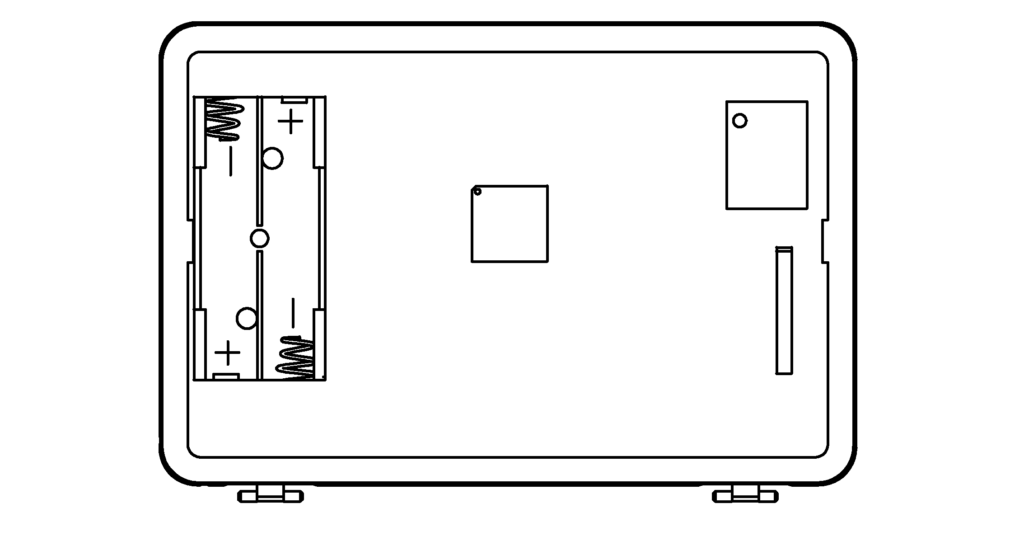
Insert the batteries in the appropriate seat inside the front, respecting the correct polarity, as indicated in the figure.
TO CLOSE THE DEVICE, COUPLE THE TWO PARTS AND PRESS THE FRAME OF THE FRONT PART UNTIL THE TWO SIDE HOOKS CLICK.
Battery replacement
When the FLASHING depleted batteries symbol appears
 they must be replaced.
WHEN THE WORD “bAt” APPEARS, THE BATTERIES ARE DEPLETED AND THE SYSTEM IS LOCKED : THEY MUST BE REPLACED IMMEDIATELY TO REACTIVATE IT.
Proceed as indicated in the installation instructions and reassemble the cover on the base before performing any operation.
Description of controls and operation
-
First ignition
When the batteries are inserted, the display momentarily displays all the segments and symbols followed by the software version number, after which the clock setting is requested.
Clock setting
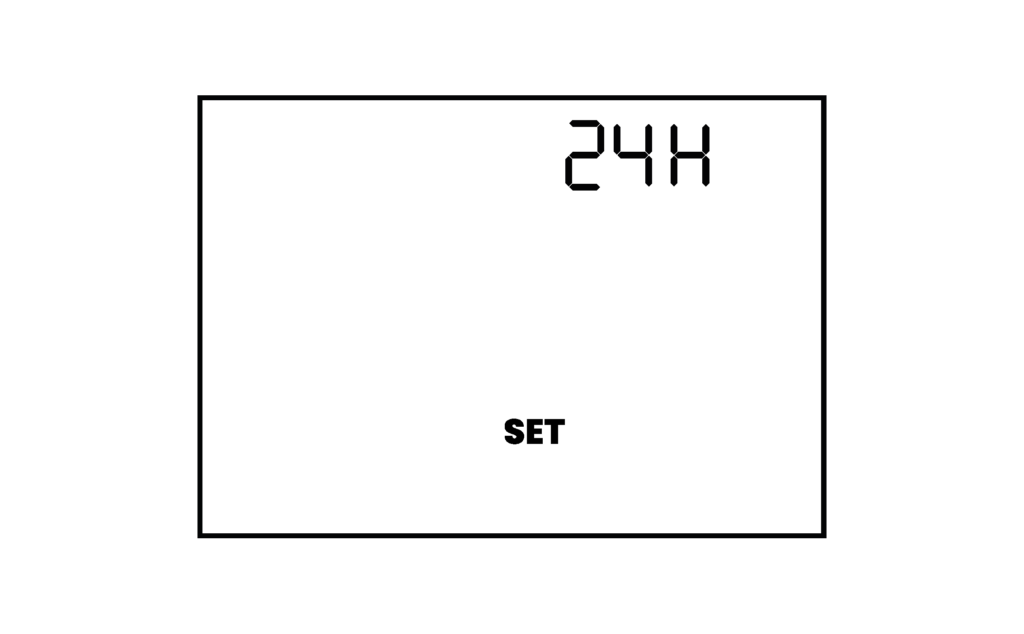
Set the format to 24H or 12H with <+ / ->, then <SET>.
- Set the time with <+/->, then <SET>.
- Set the minutes with <+/->, then <SET>.
- Set the day with <+/->, then <SET>. (only for the WEEK version)
The device is set to [OFF] mode.
Note: If the setting procedure is not correctly performed or completed within 10 minutes, the device will be activated, displaying the flashing clock and room temperature value on the display. In this case, for correct activation of the thermostat, the following are necessary:
- Set the time with <+/-> and confirm with<SET>.
- Set the minutes with <+/-> and confirm with<SET>.
- Set the day with <+/->, then <SET>. (only for the WEEK version)
Mode [OFF]=ANTIFREEZE, winter
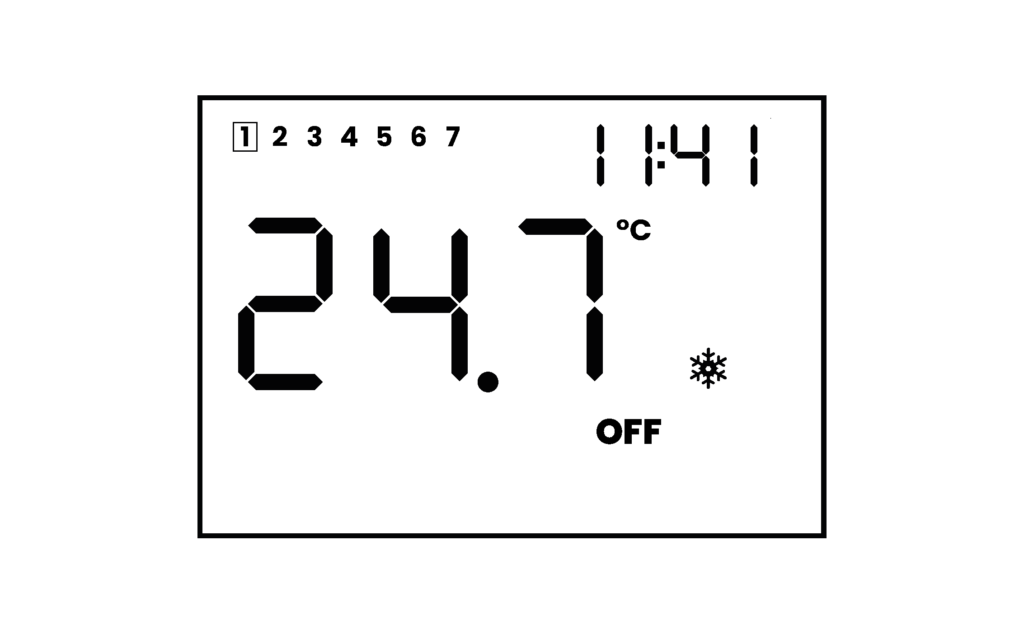
The display shows OFF, the clock and the room temperature. The antifreeze function is active.
In this mode the thermostat preserves the system by activating the boiler only when the room temperature drops below a minimum value (factory set at +6°C).
Active modes: Automatic [
.AUTO] and Manual [MAN]Press
in succession to switch to [.AUTO] mode, [MAN] mode and to return to [OFF] mode..AUTO = Temperature Regulation according to time ProgramMAN = Operation with Manual Temperature set.
Pressing the <SET> key in these two operating modes allows alternate displaying of the clock or of the active set temperature (in the top right of the display).
Automatic mode
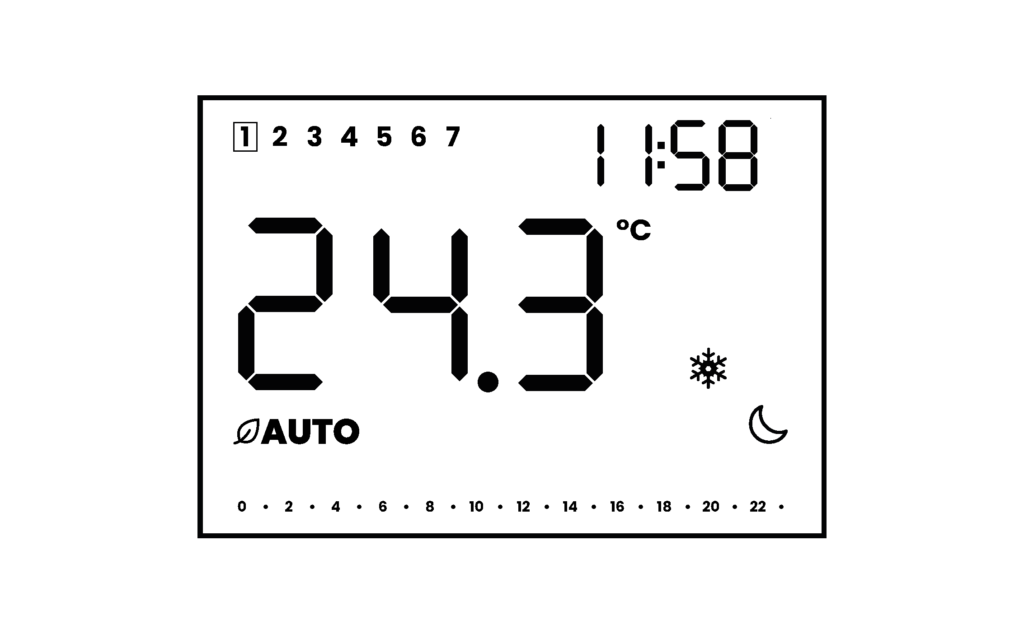
The comfort set temperature (hereinafter: TC) or reduced set temperature (hereinafter: TR) changes automatically depending on the time program stored.
Upon the first power-up, no time slot is programmed and the TR (symbol
 ) is set by default.
Comfort (TC) and Reduced (TR) Temperature Settings
Press
in succession to display the TC (symbols  and [SET] flashing or the TR (symbols and [SET] flashing).
Press <SET> to exit the display, or press the < +/-> keys to change the value.
Press <SET> to store the new values and to return to the [AUTO] mode
If the procedure is not completed, after 10 seconds of inactivity, the thermostat returns to [AUTO] mode with the previously stored values.
Factory settings:
Winter mode

Comfort temperature 20°C
Reduced temperature 16°C
Summer mode
Comfort temperature 24°C
Reduced temperature 28°CTime programming
Before proceeding with programming, make sure that the clock settings are set correctly.
Otherwise, go to the user menu to update the data (see User Menu chapter).
DAY model programming
The 24 keys correspond to the 24 hours of the day and are only active in [AUTO] mode.
Press the key corresponding to the desired time to activate the TC (its segment will be on) or TR (its segment will be off).
For each hour it is possible to program the single ½. Press the key several times to obtain the on and off sequence of the corresponding segment, as indicated below.
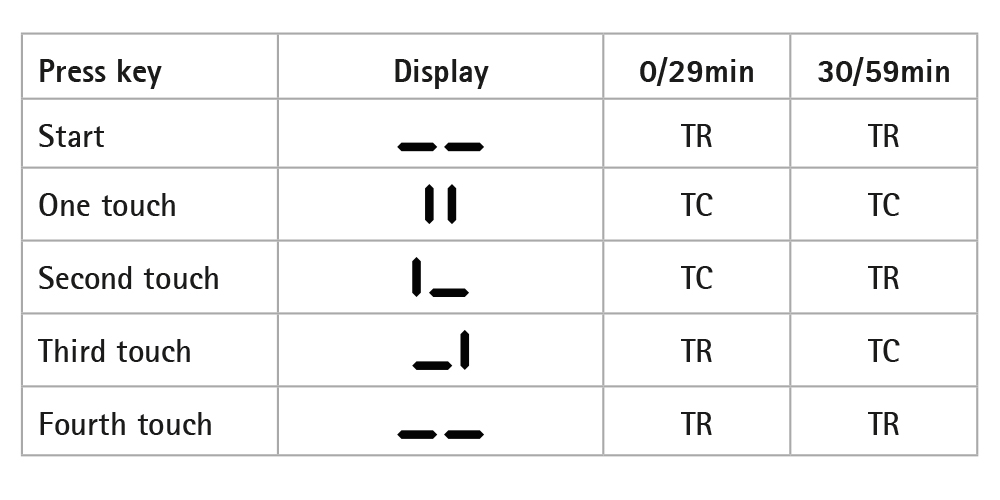
Any change to the programming changes the previous settings; the change is immediately acquired and activated without further confirmation.
WEEK model programming
In the WEEK version it is possible to set a different time programming for each day of the week. Press
to activate the weekly programming function. The display shows [SET] and the current day tab is flashing.
Proceed with today’s programming as described for the DAY model (previous chapter).
Press +/- to move to the next or previous day.
Run the new day program and repeat until the weekly programming is complete. Once finished, press
to validate the program and to return to the AUTO mode.Copy function
To facilitate weekly programming, it is possible to copy the daily settings entered to the next day. Once the day programming is set press <SET>. The programming will be copied to the next day (the new day flashes). With each additional touch of the <SET> key, the programming will be copied to the next day.
At the end press
to exit the programming and to validate the choices.Each change to the active day programming changes the previous settings. The change is immediately acquired and activated without the need for access to programming functions or further confirmation.
Temporary forcing of the set temperature
During operation in [AUTO] mode it is possible to TEMPORARILY change the value of the desired temperature active at that time (either TC or TR) without entering programming mode.
This change does not alter the pre-set values of TC or TR and is only active until the next change of state (TC/TR or vice-versa) provided by the program.
Pressing the <+/-> keys changes the value of the active temperature that is flashing in the upper right. The setting is acquired by pressing the <SET> key or at the end of the flashing.
N.B.: IF THERE ARE NO CHANGES OF STATUS IN THE PROGRAM, FROM TC TO TR OR FROM TR TO TC, AFTER FORCING, THIS FUNCTION WILL REMAIN ACTIVE AND WILL BE EQUIVALENT TO USING THE DEVICE IN [MAN] MODE.
Manual Mode [MAN]
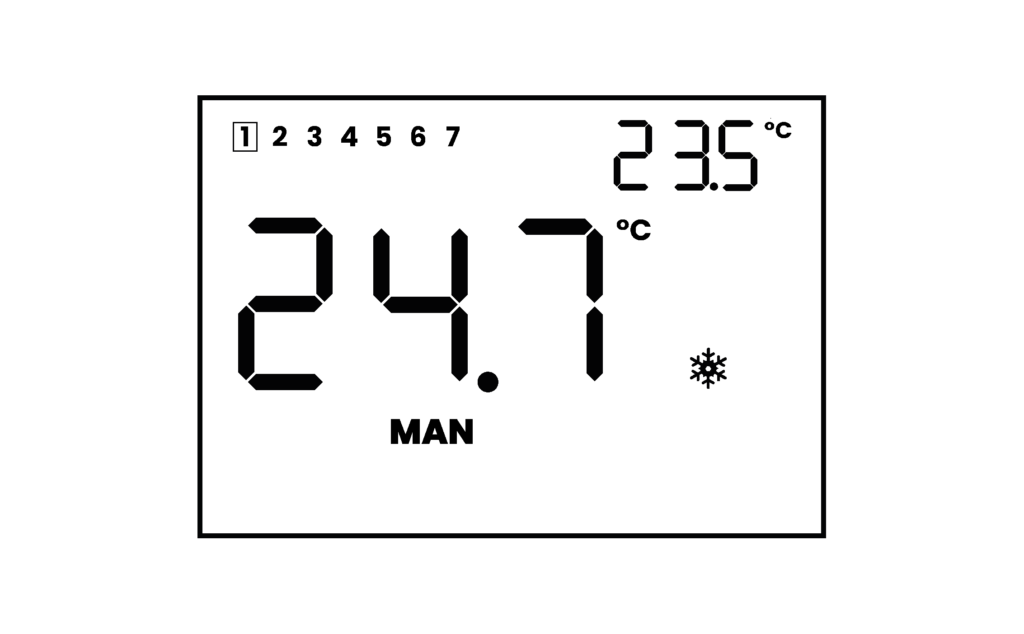
The thermostat regulates the room temperature exclusively according to the manual temperature setting.
Press <SET> to display the set temperature.
Press the <+/-> keys to change the desired temperature (between 5 and 35°C). The value is displayed in the upper right flashing. The setting is acquired by pressing the <SET> key or at the end of the flashing.
Factory settings:
Winter mode:
: 20°C
Summer mode:: 24°CWinter Season Mode (
) (Factory Setting)The Comfort Temperature is greater than the Reduced Temperature (TC > TR)
Tamb = room temperature
Tset = set temperature
When Tamb < Tset, the heating is activated, flame symbol active

When Tamb = Tset, the heating is deactivated, the flame symbol is no longer present on the display.
The next re-ignition will occur when the Tamb < Tset ± hysteresis.
To switch from Winter (Heating) season mode to Summer (Conditioning) season mode and vice-versa refer to the next USER MENU chapter.
Summer Season Mode (
)The Comfort Temperature is lower than the Reduced Temperature (TC < TR)
Tamb = room temperature
Tset = set temperature
When Tamb > Tset, the cooling is activated, active fan symbol
 .
.When Tamb = Tset, the cooling is deactivated, fan symbol no longer present on the display.
The next re-ignition will occur when the Tamb > Tset + hysteresis.
To switch from the Summer (Conditioning) season mode to the Winter (Heating) season mode and vice-versa refer to the next USER MENU chapter.
USER MENU
Through the User Menu it is possible to vary the following parameters:
1)Summer/Winter Mode (
/)
2)Clock setting
3)Display brightness setting ( )
)To access the User Menu activate the [OFF] mode using the key
and press the key .The display shows the word [SET] flashing.
1)Summer/Winter (
/)The snow flake (factory value) or sun icon flashes.
Press the + key to set the winter mode (
).Press the ± key to set the summer mode (
).Press the <SET> key to confirm the operation and go to the next parameter or wait for the end of the flashing to exit the Menu, saving the modified data.
2)Clock adjustment
The hour flashes (the day for WEEK model also flashes)
Press <+/-> to adjust the hours, <SET> to confirm
Press <+/-> to adjust the minutes, <SET> to confirm.
Press <+/-> to adjust the day (week model only)
Press the <SET> key to confirm the operation and go to the next parameter or wait for the end of the flashing to exit the Menu, saving the modified data.
3)Brightness setting
The icon
and the currently set value (50% factory) flash.Press <+/-> to increase or decrease the brightness. Press the <SET> key to confirm the operation and exit the Menu or wait for the end of the flashing to exit the Menu, saving the modified data.
INSTALLER MENU
ATTENTION: THE PARAMETERS CONTAINED IN THIS MENU IF MODIFIED AFFECT THE OPERATION OF THE DEVICE
To access the Installer Menu, activate the [OFF] mode and simultaneously press the < + > and < – > keys for at least five seconds.
The display shows the word [SET] flashing; the number of the parameter and the value set.
Press the <SET> key to display the parameters, press the <+/-> keys to change the value of the displayed parameter. Press the <SET> key to confirm the change and to move to the next parameter.
P01 ANTIFREEZE THRESHOLD
Factory setting +6°C, adjustable between 5.0 to 10°C, with 0.5°C variation.
P02 HYSTERESIS
The factory setting 0.2°C, adjustable between 0.1 and 2.0°C.
Is defined as the difference between the desired temperature (which causes the system to switch off once reached) and the temperature to be reached for the system to reactivate. The correct adjustment must be made according to the characteristics of the system and the perceived comfort.
P03 ROOM TEMPERATURE READING CALIBRATION
Factory setting 0.0°C, adjustable from -5.0 to +5.0°C
P04 REGULATION TYPES SETTING
0 = Hysteresis ON/OFF regulation
1 = TPI regulation for radiator systems
2 = TPI regulation for floor systemsFactory setting “0”. For further information refer to the following chapter REGULATION TYPES.
P05 RESET PARAMETERS TO FACTORY VALUES
Displaying of word [rSt]. Press and hold the <+> and <-> keys simultaneously for a few seconds.
Evidence of the reset to the factory settings is given by the shutdown of the display and the progressive display of three horizontal segments with the subsequent thermostat restart.
To not perform a RESET TO THE FACTORY PARAMETERS, press the <SET> key to confirm the operation and exit the installer Menu.
TYPES OF REGULATION
Hysteresis On/Off regulation
This is the traditional ON/off operation: in winter the system is activated continuously until the desired room temperature is reached.
At this point the system will remain off until the room temperature drops below the desired temperature minus another factor called hysteresis. In summer mode the operation is reversed.
TPI regulation
The TPI is a type of regulation that ensures activation of the system for the minimum time necessary, but sufficient to maintain the room at the selected temperature.
A thermostat with TPI continuously measures the ambient temperature in which it is placed and performs a series of calculations to establish the duration of the ignition of the system to reach and maintain the set temperature, thus increasing energy efficiency.
The system will turn on for increasingly shorter periods as it approaches the correct temperature. When the setpoint temperature value is reached in the room, the system is switched on for short periods in order to maintain this temperature.
WARNINGS FOR CORRECT DISPOSAL OF THE PRODUCT
At the end of its useful life, the product must not be disposed of together with municipal waste.
It can be delivered to the appropriate separate collection centres set up by the local authorities, or to the retailers that provide this service.
Disposing of an electrical or electronic appliance separately avoids possible negative consequences for the environment and health deriving from its inadequate disposal and allows recovering of the materials of which it is composed in order to obtain the significant saving of energy and resources.
To highlight the obligation to dispose of electrical and electronic equipment separately, the product bears the crossed-out mobile waste container mark.
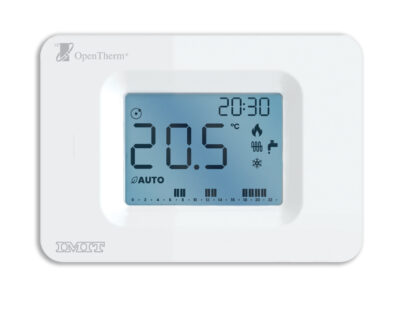
ORION DAY OT
PRODUCT DESCRIPTION AND TECHNICAL SPECIFICATIONSORION OT, in the version with daily (ORION DAY OT) or weekly (ORION WEEK OT) programming, is a chrono-thermostat designed for the remote control of modulating boilers with standard OPENTHERM communication protocol, but it can also be used in combination with appliances of Traditional ON/OFF or with TPI algorithm type control.
This manual shows the instructions for using the device in OPENTHERM mode (factory-set). Please refer to the instruction sheet dedicated to ORION DAY / WEEK devices for all the information common to both operating modes and those dedicated to the ON/OFF operating mode only.
Power supply:
In OPENTHERM mode (modulating): 2 unpolarized boiler bus cables (OT)
In ON/OFF mode (relay): 2 x Alkaline Batteries 1.5 V LR6 (Type AAA)ErP Class (EU Reg. 811/2013- 813/2013):
V In modulating OPENTHERM mode (-3%)
IV In ON/OFF mode with TPI function (-2%)
I In traditional ON/OFF mode (-1%)INSTALLATION
Before installing ORION OT we recommend to check its compatibility with the boiler: BUS communication protocols other than OPENTHERM could affect the operation of the system.
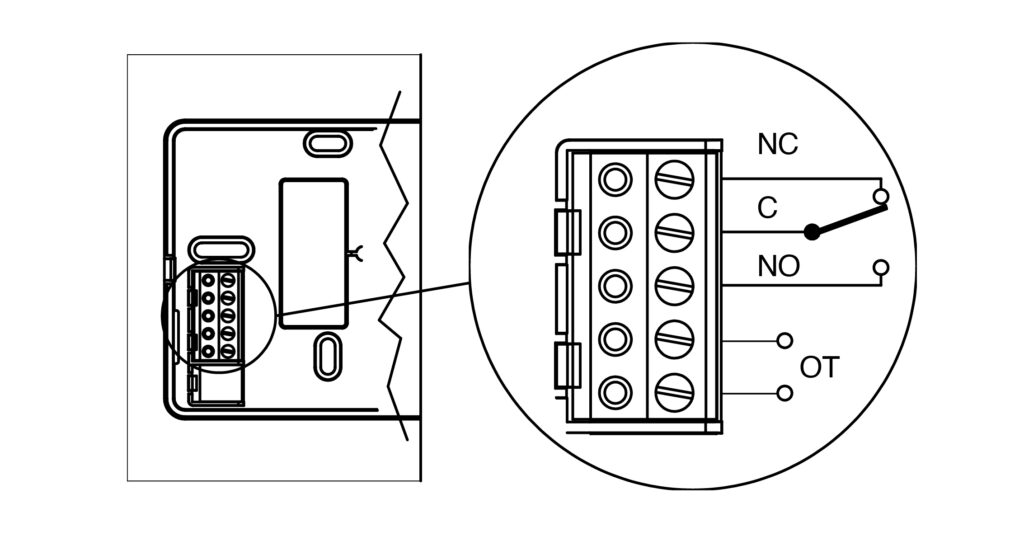
To complete the installation follow the instructions of the standard ON/OFF devices. For electrical connections, refer to the figure below, taking care to use ONLY the terminals indicated with OT for the operation in OPENTHERM mode or the NC-C-NO terminals for the operation in ON/OFF mode.
Make sure that the internal protection of the terminals is properly positioned before closing the appliance.
At the time of the first installation and during the boiler on and off phase, it may take a few seconds both to guarantee the correct modulation and for the correct acquisition of operating data.
DESCRIPTION OF CONTROLS AND DISPLAY
In the OPENTHERM mode, the functions of the keys do not change with respect to the standard ON/OFF versions. As regards the display, in addition to the icon indicating the OPENTHERM mode enabled, there are icons dedicated to the management of the heating system and the domestic hot water function.
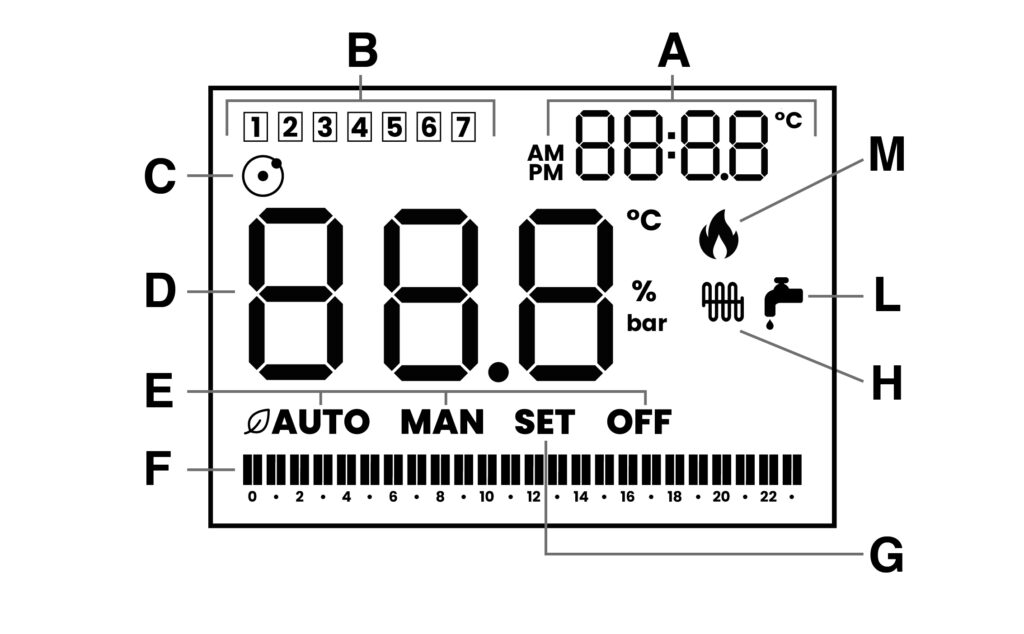
A) Clock / set temperature/ parameter indication
B) Day of the week (Week version only)
C) OPENTHERM mode enabled
D) Room temperature / Operating values
E) Operating mode enabled (AUTO/MAN/OFF)
F) Hour program enabled (AUTO mode)
G) Parameter setting (SET)
H) Fixed ON = Heating mode enabled
Flashing = System in operation
L) Fixed ON = Domestic hot water mode enabled
Flashing = Sanitary water drawing in progress
M) Boiler control enabledDEVICE ACTIVATION
For the operation in OPENTHERM modulating mode, the appliance is powered directly by the boiler to which it is connected and does not require batteries. In this mode, depending on the boiler characteristics, the display backlight could be reduced or excluded. For the use in ON/OFF mode, the appliance must instead be powered by two alkaline batteries of AAA type, properly inserted in the dedicated compartment.
When the device is switched on, all the segments and symbols of the display are shown for a few moments, followed by the indication of the software version in use before the request to set the clock.
Follow the instructions of the standard ON/OFF models for the initial settings and the management of the MANUAL (MAN) or AUTOMATIC (AUTO) operating modes with the relative programming of the time slots.
CHANGE THE OPERATING MODE
The device is factory-prepared for operation in modulating OPENTHERM mode.
This setting can be easily changed at any time if you choose to use the appliance in the traditional ON/OFF mode. In this case, after separating the front part of the thermostat from the wall base, insert the batteries in the appropriate seat as indicated in the instructions of the standard ON/OFF devices and make the correct electrical connections as shown in the INSTALLATION chapter.
When you switch on the device, during the display phase of the software version in use, press the ‘MENU’
and ‘LEAF’ keys simultaneously and keep them pressed until the three dashes confirming the correct execution of the command are displayed. At this point the thermostat will restart with the new operating mode.
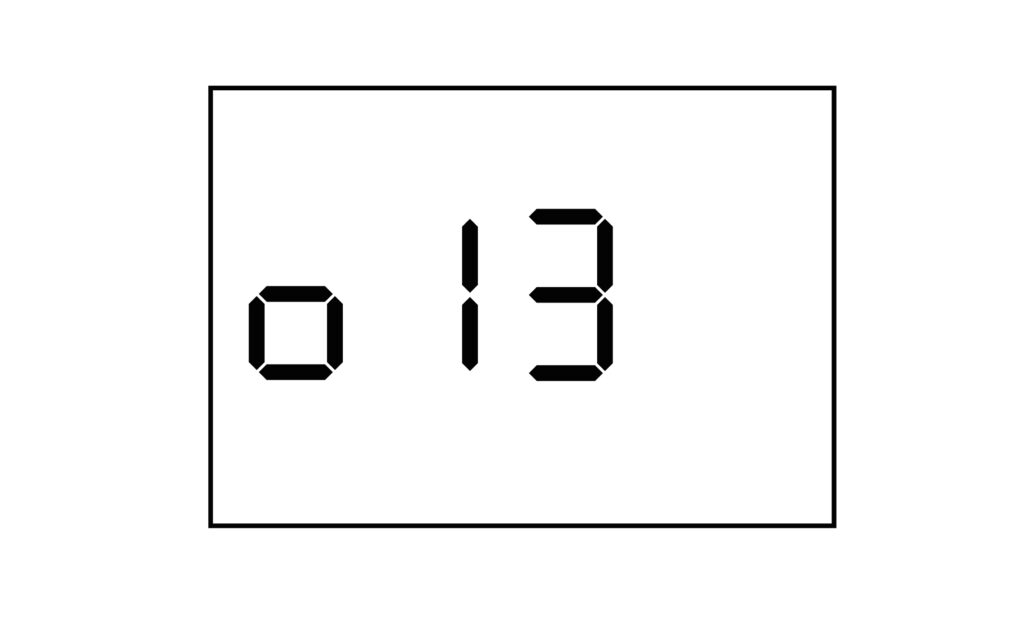
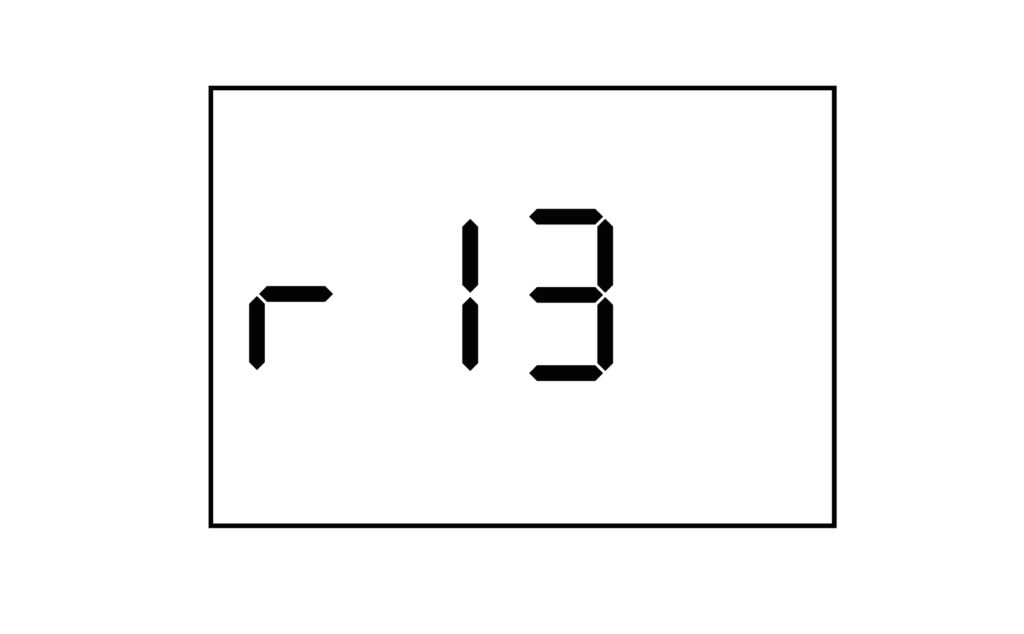
The confirmation of the actual setting is found in the encoding (first character) of the Software version in use, visible after turning on the device, as indicated below:
Software version indication for operation in OPENTHERM mode
Software version indication for operation in Standard ON/OFF mode
Perform the same procedure to return to the Software version suitable for the OPENTHERM operating mode, REMOVE the BATTERIES and make the correct electrical connections (see INSTALLATION chapter) before connecting the thermostat to the boiler.
SETTING MENU AND OPENTHERM PARAMETERS VISUALISATION
Use the ‘LEAF’
key to put the device in MAN mode or in OFF mode and press the ‘MENU’ key to enter the setting menu.The display shows the flashing SET word (at the bottom) and the parameter code (at the top right).
Press the ‘MENU’
key to move on to the next parameters, storing any change of the set value.0000 : Clock setting. Set the time with the <+/-> keys and confirm with <SET>, then set the minutes with <+/-> confirming them with the <SET> key and the day of the week with <+/-> (only for the WEEK OT version). The confirmation with the <SET> key allows to move on to the next parameter.
Ot01 : Choice of the operating mode. Press the <+/-> keys to switch between HEATING+DOMESTIC (factory preset value) / HEATING ONLY / DOMESTIC ONLY. The setting is signalled by the relative icon turning on.
Ot02 : Setting of the Domestic hot water temperature. Press the <+/-> keys to change the value displayed between 35.0 °C and 65.0 °C (factory preset 50.0 °C). Flashing icon .
.
Ot03 : Setting of Heating temperature. Press the <+/-> keys to change the value displayed between 10.0 °C and 80.0 °C (factory preset 60.0 °C). Flashing icon .
.
Ot04 : Visualisation of the current Domestic hot water temperature. Fixed ON icon.
Ot05 : Visualisation of the current Heating water temperature. Fixed ON icon.
Ot06 : Visualisation of the current system pressure (bar)
Ot07 : Visualisation of the percentage of the boiler current modulation (%)
Pressing the ‘MENU’ key again you return to the device operating status (MAN or OFF).INSTALLER MENU
WARNING: CHANGING THE PARAMETERS CONTAINED IN THIS MENU MAY AFFECT THE OPERATION OF THE DEVICE.
Follow the instructions of the standard versions ON/OFF to access the INSTALLER MENU and to manage all the parameters except the P04 one (selection of the ADJUSTMENT TYPE) not available for the OPENTHERM version of the device.
VISUALISATION OF THE ALARMS
During normal operation, the device performs a continuous self-diagnosis, highlighting any anomalies on the display with the words ™AL0∫ followed by a number.
The visualisation on the display of alarm codes other than 0 indicates anomalies on the system or on the boiler and are transmitted to the device by the boiler itself. In this case, the type of anomaly found and any suggestions are to be found in the boiler instruction manual.
The device is reset when the error conditions are cleared.
The visualisation of the word ™AL0∫ on the display indicates the momentary lack of communication with the boiler and all the functions of the device are blocked (alarm managed directly by the device only in OPENTHERM mode).
The activation of this alarm during the first power-up phase may be due to:
- Type of boiler not compatible with the standard OPENTHERM protocol
- Inconsistency between the expected operating mode (OPENTHERM or ON/OFF) and the selection of the correct software on the device
- Presence of batteries with device Software set for OPENTHERM operation.
If after checking the settings it is necessary to change the selection of the operating mode of the device (effectively resetting the alarm status), proceed as indicated in the OPERATING MODE CHANGE chapter.
TROUBLESHOOTING
Reactivation of the device after the lack of power supply:
- In use in OPENTHERM mode: lack of mains voltage/shutdown and subsequent boiler restart
- When using in ON/OFF mode: insertion/replacement of batteries
After each restart the device requires the clock to be reset in order to be able to correctly run the preset time programs. If this procedure is not correctly performed or completed within 10 minutes, the device will activate in MANUAL mode (MAN), displaying the flashing clock and the value of the ambient temperature on the display. Then, pressing any key will allow you to set the clock and return to normal operation.
Failure to turn on the display:
- When using in OPENTHERM mode, ensure that the connections made both on the thermostat (see INSTALLATION chapter) and on the boiler are properly performed and that the boiler is operating.
- When using in ON/OFF mode, check that the batteries are efficient and correctly inserted in the appropriate compartment.
In case of suspected anomalies during operation, restart the appliance:
- When using in OPENTHERM mode, remove and restore power by separating the front part of the device from the wall base for a few moments.
- When using in ON/OFF mode, remove the batteries for a few moments.